How to Configure Gmail’s Inbox
Gmail Tabs
If you are using Gmail and you have not changed the Configuration of the Inbox then you probably see three Tabs across the top of your Inbox that say Primary, Social, and Promotions.
Gmail tries to sort out your different emails according to those groupings. Sometimes important emails go into the incorrect Inbox.
If your emails from Tom Bird are not showing up in your Primary Inbox then follow the steps below.
- Click on the tab of where the email you want to move is located. In our example, the Tom Bird Newsletter is in our Promotions tab.
- Drag the email and drop it on the tab labeled “Primary”. (See Image 1 below)
- (To drag and drop – use your mouse. Click the mouse on the email title and hold down the button while moving the pointer, “drag”, over the Primary tab. Once the mouse is over that tab, release the mouse button, “drop”)
- Once you have dropped the email Google will display a pop-up message asking if you want to do this for future messages from that email address. Be sure to click “Yes” so you do not have to repeat steps 1 and 2 for each email. ( See Image 2 below)
NOTE:
It’s possible that you will receive emails from various Tom Bird email addresses. It really depends on what you have signed up for in the past. So you may need to repeat all the steps above if you have signed for Tom’s other events other than Free Gifts.

Image1: Moving email from Promotions Tab the the Primary Inbox tab. Just drag and drop the email from one tab to the other Tab.
To Consolidate all Gmail Tabs into One Inbox.
It you want to get rid of all the extra tabs, you can consolidate them into one Inbox for all your email.
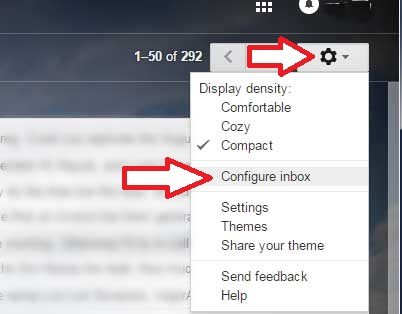
- Click on the setting menu icon, it’s a small gear on the right side of your page. That will open up a pop-up menu. (See Image 3 below)
- Click the menu “Configure inbox”. That opens up a pop-up dialog box.
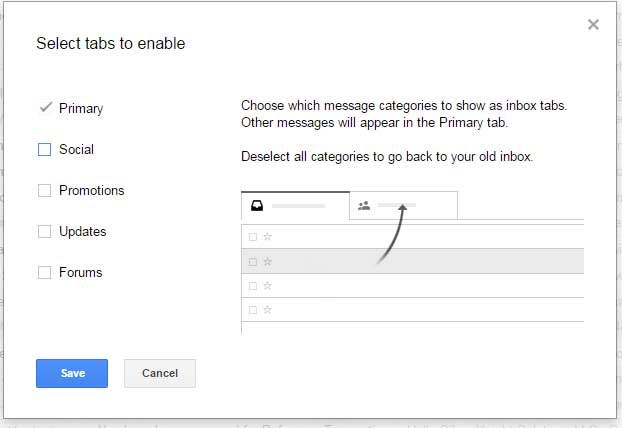
- Uncheck the boxes for the Tabs you do NOT want to see anymore. Don’t worry, you can always activate them again if you do not like using the Primary inbox only. (See Image 4 below)
- Click the Save button. Your inbox will now reorganize your emails.


